Friday, June 24, 2011

The Brandon Project

Last fall my daughter met a guy - actually they'd met briefly 5 years ago but last fall's "met" was more like "MET". 

Yup, they fell in love and so last month they moved in together.

Meet Brandon - he's the big one on the right holding his nephew.
Quick recap for those who are joining us "late in the season" - my daughter is 24, a structural engineer, and works in San Francisco. She lives in a lovely studio apartment with a view of the Golden Gate Bridge. When she moved from college last summer, we had a lot of fun decorating her new digs in modern "Mary Tyler Moore".

We were aiming for a sleek shabby chic.

...with pink as our accent color.
But now that she's no longer living alone...well...let's just say that the fuchsia curtains and floral slipper chair are a bit too much on the feminine side for a man who owns a garage full of tools and 5 lacrosse sticks.

And Brandon (who also enjoys watching sports from a reclining position) is not a little guy - he's 6'4" - so her moss green "love seat" was more of a "hate seat" for him. Luckily, she was able to foster it out to a loving home (with shorter residents) and they adopted a new full size couch from a friend who was moving to New York.

This adoption was a giant step in the direction of transforming "hers" into "theirs".

Except..."The couch has some small rips and the satin cushions are dingy," Erica told me on the phone.

"We can reupholster it!" I declared feeling like supermom. That is, until I realized that their house blues weren't limited to a touch of older couch flu...it was really more of chronic condition that had spread to many of the furnishings.

In order to transform their space into the sleek and modern flat they desired we were going to reupholster:
1. the aforementioned couch,
2. the clashing ottoman,
3. the floral slipper chair,
4. the fake Tuscan painting,
5. the dining chair cushions,
6. and two lampshades.

I'm tired just typing all that!

We began treatment with a stiff shot of antibiotics in the form of a trip to Home Fabrics. With the help of some girlfriends we ferreted out some bargain fabrics in a terrific new color palate.

Erica and Megan pose for their "Engineers Decorate!" pilot episode cover shot.
Back home Brandon liked the fabrics...mostly. The grey for the couch was a go; the stylized brocade had enough Asian influence to intrigue him; even the geometric was well-received; but the bright - almost chartreuse - yellow for the slipper chair? Well...it was a worry.

True confessions here...it had me a little worried too. I mean, any fabric you have to sew wearing sunglasses gives rise to some misgivings.

But Erica has always had a gift for color and she's still got it. Wait until you see the final result.

Now don't think for a second that I was doing all this work on my own - these two are a fun-loving couple and game for just about anything. So I dressed them up like Mariachis and handed them staple removers.

"Ready to remove staples boss!"
Okay, they dressed themselves like Mariachis (for the Bay to Breakers Parade) but I did give them staple removers and they dug right in...and started removing the 1,000+ staples holding the old fabrics in place.
Erica was a good sport about removing staples...in the beginning.

Brandon had the best technique so removed more than his fair share.

I'd remembered extra tools, gloves, my air compressor, upholstery stapler, sewing machine, etc. - everything we'd need for the transformation...except the power cord for my sewing machine.  A quick trip to Target and Erica became the proud owner of her first sewing machine. (Will someone please explain to me how a $150 machine can do 90% of the things my 20 year old $3,000 Elna can do?) 

Of course there was still loads of hand-sewing to do...
We started with the couch since it was the one "have to finish" item on our list. Remember, we'd vowed to complete all of this in a single weekend as both Brandon and Erica had to be back to work bright and early Monday morning.

The finished couch looks very tailored with the grey suit-weight upholstery, Ultrasuede bolsters, and geometric throw cushions.
This is the "before" slipper chair pic.

We'd already reupholstered the slipper chair once before to make it pink so it went quickly.


The color totally works - it's more than an occasional chair - it's art!
They pretty much completed the ottoman redo on their own.
Just to refresh your memory - the old ottoman was green and skirted - very feminine.
The new ottoman is sleek and tailored - nice!
We made it! By Sunday night all the reupholstering was done and all that was left were minor adjustments and the clean-up.


It's like the apartment "grew up" - martinis anyone?

And that slipper chair is the star of the show.
The happy (but exhausted) couple are super happy that it's all over.

Wednesday, June 8, 2011

Sew Evolutionary...

For those of you who prefer pictures to reading (Dave) I'm going to share the evolution of my new sewing table primarily in pictures.

My goal was to organize all my sewing stuff in one place. I wanted it to be efficient (everything close at hand), portable (something I could roll out of sight), and pretty (so I will be inspired to sew).

Here's how it went:
Garage sale pic: for $2 (including delivery) how could I pass this old headboard up?
It's narrow enough to roll into the closet but how do I attach the wheels?
Adding a scrap of plywood should do the trick.
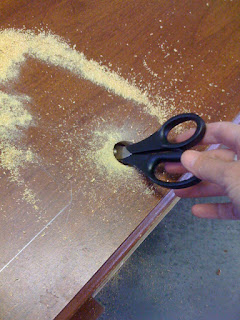
My sister suggested boring a hole in the top to keep my scissors handy. Clever girl.

Unfortunately, I forgot to include the height of my wheels in my ergonomic calculations so I can't use a regular chair to sew dang it!

But I found this old stool for $3 at another garage sale...
Some spray paint and fabric and it looks like new!
Adding notion shelves required digging out needles, elastics, etc. to make sure everything would fit neatly.
I also wanted shelves for my quilting books and presser feet.
Here's a pic after the first coat of primer...it took 3 and then 3 more coats of paint to cover the hideous brown.
I found this thread holder at another garage sale for $4.
Sprayed it black...
It keeps all my thread handy on one end.
I knew the white paint wouldn't hold up over time so I modge-podged more of the fabric on top and then varnished it.
I also modge-podged fabric onto an old Lego container from when the kids were tiny.
I made stacking boxes out of cardboard to fit inside the Lego bin.


They fit perfectly and match the top and stool.

All my sewing notions are kept handy on my shelves.

With my cutting mat hanging from hooks on the back, my cutting tools and rulers hanging handy inside the leg space, I'm all set to SEW up a storm!

Tuesday, June 7, 2011

And They BBQ'd Happily Ever After...

There were only three small items left to complete in the backyard before the final celebration could occur...

1. The outdoor chandelier:

Because...uh...every yard needs one? Okay maybe "need" is too strong a word. You see, I was garage-saling with Caroline and Ellen a few months back and we happened across this terrific chandelier for only $5!

Here's the chandelier with it's primer coat.

Sure my Mini Cooper was already filled to the brim with a table, a stool, boots, shirts, and other miscellaneous treasures obtained at rock bottom prices from the previous 9 houses we'd stopped at...

But it was ONLY $5! I had to have it. The owner looked kind of sheepish when he accepted my fiver and handed me the chandelier. We both eyed the frayed wiring, the flaking gold finish and the bent bulb holders. I could tell he felt guilty for pulling one over on poor little innocent me...

But I had a plan.

I had no intention of ever sending electricity through the dang thing and yet I was counting on it to cast a romantic glow to desert evenings. 

How you ask?

Easy. I hot-glued cheap solar lights to each arm after spray-painting it the same turquoise as my bistro chairs.

I removed the spikes from the solar lights and embedded the tops in hot glue.
This is the view looking up from the hammock.

2. The patio table:

We used to have a large glass and metal patio table but I hated it because it was just too big for our house which meant I was forever squeezing around it to get where I was going outside.

Remember that table I mentioned a minute ago? My idea was was to use the top from a coffee table I'd snagged at another garage sale and the legs from the side table I bought with Ellen and my sister.

I confess that once I'm in garage sale mode, I don't always check my purchases thoroughly (the bargain-haze sometimes clouds my vision). So this great "butcher block" top I thought I could refinish, turned out to be particleboard and cheap veneer. I was sad.


Of course I didn't discover the veneer until I started sanding...

But I still needed a patio table. So I went ahead cutting the legs down to create the right height.
And of course the ends chipped off when I flipped the table over to test for level...it was a "Monday" project :(

And then I painted it using the leftovers from the blue stucco wall and the turquoise spray paint.

Pretty much I was so irritated by the whole thing that I was unwilling to spend even a dime on more paint.
3. The desert garden steps:

Since we moved to the desert I have developed a sincere interest in desert plants - specifically cacti and succulents. Now you can buy a wide variety of both at the local garden centers but I must have been going on and on about my new interest because friends have started giving me extras from their gardens...

I decided since they are pokey plants, I'd keep them outside the Chihuahua wall (keeing the vet bills low) on the rocky hill where they would get plenty of sun and have good drainage (it seems it's easy to drown them - the plants not the Chihuahuas).

My new barrel cactus and Aloe Vera - thanks Bill!

The only problem was I couldn't get to them easily to maintain them.

Clearly I needed steps.

So I began to collect up all the boulders we'd unearthed during the excavation for the backyard.
 
You can just see the steps on the right though the Palo Verde branches.

The steps lead neatly up to the top walk next to the prickly pear.

And then the burgers were a'grillin, the fans were a'spinnin, and the adult beverages were a'flowin.

Pat, Matlina, and Annette enjoyed their MaiTais at the Tiki Bar.

Jessie, Dave and Patrick relax on the covered patio.

Ken kept a close eye on the proceedings.

And Ellen finally got to sit down after helping with darn near every step in the entire project!