Wednesday, May 18, 2011

Stepping Out

Now I know that many of you think that I am nuts for doing all the things I do with all my projects (and you may very well be right) but I just want to go on the record that...

I AM NOT THE ONLY ONE!

It seems that after helping me build my stone bench, my friend Ellen decided that she'd like to build some flagstone steps over at her place.

You see, there's a small but treacherous hill between Ellen's house and her next door neighbor's. Ellen routinely skids down this hill for a chat and a morning coffee with Kathy next door. But then she takes her life in her hands trying to the scale the dang thing on her return trip.

Add in the occasional glass (or two) of red wine at a Friday night firepit and the hill becomes a slippery mountain of doom.

Clearly steps are needed.

I had learned from my back-tweaking flagstone experience that the key to working with flagstone is to invite a crowd of strong and healthy folks to schlep the stuff into place.

Ellen is no fool and so that's what we did.

We started at the bottom of the hill and dug out a spot for the first step. Jessie and Patrick placed the flagstone pieces while Matlina positioned the rocks just so.

Patrick places the second step with Ellen coaching and Jessie standing ready.
Ellen kept a close watch on the positioning but honestly each step was a collective effort as we each added a bit of dirt here or dug out a small rock there to get everything level and secure.

A quick spray to clear off the dust and steps are born!
Jessie is an expert with all things concrete so offered to mortar the gaps in the flagstone. Of course Ellen just happened to have a bag on hand - she has everything in her garage!

It's hard to capture the slope of the hill - trust me when I say it's a challenge to climb it.
We were pretty pleased with the final product and Ellen added the solar globes for nighttime safety (often there's a firepit and red wine on Saturdays too).

The only problem was that all those coffee visits (and some rain) had washed a lot of the rock off the hill leaving some bare spots. Normally, no one probably would have noticed but with those eye-catching steps...well the hill became a focal point.

The only question left was where could Ellen find the gravel she needed to recoat her hill?

Did I mention that I ordered 8 tons of pea gravel for my backyard pathways...and still had 3 tons of it left?

We assembled our team of shovel-wielding neighbors and set to work on the Great Gravel Gadabout...

(Alliteration is really hard with "G's")

I wish I'd remembered to take pictures of the pile while it was still on the side of our house so you could see what we had to go through to get it onto Jessie's flatbed trailer...just imagine the five of us using the old-fashioned bucket brigade approach...only replace the buckets with shovels and fill the air with grunts and groans and the occasional epithet.

Does it looks like 3 tons? It sure felt like it!

Getting it off the trailer was a little easier - Dave manned the wheelbarrow while the rest of us took turns filling it or spreading gravel on the hill.

Then we had to wash down Jessie's trailer to clear off the inch thick layer of gravel dust that had settled on every surface.

Dave and Patrick are pretty skilled with the hose and brooms.

Now don't those steps look pretty? And wine proof?

Not too bad looking for $65 in garage sale flagstone.

We just need to know if they are are pina colada proof!

Matlina and Patrick drink up their reward.

Thursday, May 12, 2011

The Chriopractor Conspiracy

Over the years it has come to my attention that certain people believe that certain government agencies have conspired over a variety of major events.

Having seen the coordinated (and often uncoordinated) efforts of many government workers (at the DMV for example) I am not a conspiracy theorist - I mean seriously - some of these workers (and I use that term loosely) can barely agree on which window to send people to so they can register their motorcycles.

But there are real conspiracies out there. In fact, I just uncovered one last week.

Let me back up a moment.

I'm sure it will come as no surprise to you that I have been reading garden decor magazines looking for ideas to enhance my backyard. This spring, many, many of these magazines featured articles (accompanied by glossy pictures of course) on how "easy" and "fun" it is to build stone benches.

I admit I have drooled over these articles and even dog-earing a few pages here and there... (How else will I know which flagstone color works best against natural stone?)

Looking back now (from a seated position next to my ice-pack) I can finally see how I fell right into their trap.

You see, last Wednesday (after consuming several handfuls of pain pills) I was reviewing one of my favorite articles and noticed the acronym: "ACA".

Suddenly all of the pieces fell into place like the little bones in your spine during an adjustment...

ACA = the American Chiropractic Association...THEY are behind this stone moving trend!

I wasn't going to make a stone bench - really I wasn't. It's just that I had this hill of rocks with no real focal point.


See? It's just crying out for something of visual interest.
And then a neighbor had a garage sale and was selling unneeded flagstone from his own stone bench and patio project for a fifth of the cost at a stone dealer.

Garage sale flagstone at 1/6th the cost of retail - wahoo!

I started by making a rock wall.

Then Ellen came over and together we started fitting the flagstones to make the seat. Soon, we had positioned the pieces to form the back rest and things were looking pretty good.

After leveling the wall, we leveled the flagstones individually.


I just had to slide one piece over just a inch. Ellen tried to help me. She did. But before she reach the slab, I had cinched it over and tweaked my back all in the same second.

Here's Ellen smoothing out the dirt in front of the bench - her back still works.

I have been to see the chiropractor now 6 times...my next appointment is Wednesday.  I want to confront him about the conspiracy but I'm worried he'll take offense and refuse to adjust my back...so I'm laying low with my icepack.

You can almost see the lake view in the distance...
At least the stone bench offers me a nice place to relax while my back heals up.

Tuesday, May 10, 2011

Tiki-tacky or Tiki-terrific?

As I've mentioned previously, the backyard project has taken on a distinctly Hawaiian flavor.

It started with the sloped roof on the shade structure, then we added some bamboo fencing.

Soon after that Dave had the idea that since we were going Hawaiian with our new tiki-bar theme, sand would make the ideal flooring. Ten bags of play sand later and all that was missing from our tiki-bar was...well...a bar.

Sure we have Craigslist out here in the desert, but we also have something called the "White Sheet" where all and sundry list their all and sundries for sale. Reading the White Sheet every week is like garage-saling from the comfort of your own kitchen table.

So I was cruising through the listings when I happened across the listing for a "Tiki Bar" (I am not making this up).

Yup - just when you declare your need to the universe, the universe answers with a dirt-encrusted and slightly broken version of whatever it was you needed.

So I bought it.

Then I scrubbed away several generations of spiders and their half-eaten lunches.

Then I fixed the broken hinge and tightened all the loose bolts.

Then I oiled it.


Left side is pre-oil; the right side is post-oil.
And how is a person to know that our "teak" bar is really a "tiki" bar? Well, all it takes is a cheap sign from Big Lots.

I LOVE my staple gun!
After hanging the sign, I realized the bamboo fence roof wasn't quite Hawaiian enough so I searched youtube for videos on making my own palapa and let me tell you there are quite a few to choose from.

All I needed was palm fronds...

When Jessie said he could provide the palm fronds as tree-trimming was on his Saturday chore list I was thrilled. And then Ellen said she would be happy to lend a hand...of course she didn't realize she'd be donating a pint of blood...those fronds have wicked thorns!
Ellen's job was to hack off the thorny stems without losing too much blood.
I used my stapling skills to create something that looked like it belonged on a high school Homecoming float or Hawaiian dancer paper dolls.

Palm fronds are really hard to staple through.
Ellen wanted to take a picture of me attaching the palm panels to the roof but had never used an iPhone before...here's the first picture she took:

Ellen's first-ever iPhone pic.

And here's the one she meant to take (after I stopped laughing so hard I could explain which way to point the darn thing).

I'm lucky she didn't push me off the ladder!

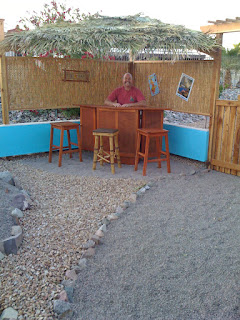
With the roof up, we positioned the tiki bar in the sand and set Dave up behind the bar...
How about some MaiTais?

Ellen deserves one!

Aloha from AZ!

Sunday, May 1, 2011

Easy Stucco Anyone Can Do...If They Know Jessie!

So the walls were built and the pergolas erected - now it was time to stucco. I know how to stucco - inside. Outside stucco is harder - there are temperature and wind factors that just didn't come up when I stuccoed the fireplace in my living room. There are also texture factors that I had never considered before.

I was worried. Luckily my neighbor Jessie has experience stuccoing and promised to stop by and teach me.

The paper and wire are all stapled to the walls and the bags of stucco are ready to go.

I mixed up the first batch of gray stucco to form our "scratch coat" under Jessie's watchful eye and produced something that resembled cake batter. Jessie scooped some up on his hawk (a flat palate looking thing with a handle underneath) and proceeded to float it onto the wall.

He made it look easy.

He made it look possible.

It was my turn.

Jessie patiently coaches me me through the steps of stucco application.

I scooped up a float-full onto the hawk.

I moved it close to the wall.

I used the same scooping swirling motion Jessie had used...

And all of my stucco fell to the ground.

"There's a force field around the wall that prevents the stucco from sticking!" I was just sure of it. Jessie must have secret powers that allow him to break through it...

I tried again.


Jessie had to walk away from my new-found profanity...stucco SUCKS!

I made another pile of stucco on the ground. I also renamed the hawk a new four-letter word also ending in "k".

Jessie took back his tools and showed me again. Then he realized that it would take less time (and less stucco) just to do it himself. I was retasked to do tops and edges using a very small trowel and a lot of plastic tarp.

This strategy worked.


The Jessie crafted walls look smooth and even.

We became a synchronized team - Dave made the stucco, Jessie troweled it on the wall, Ellen and I did the tops and edges.

The wall looked great!

The next day, it was time to do it all over again for the "brown coat" which is also done with gray stucco. Am I the only one who questions the naming of these things???

We had our routine and we flew through the second coat ending with beer and wine on the porch to admire our efforts.

It was during the adult beverage portion of the project that the subject of a third "top" or "color" coat was discussed. Jessie was fairly sure he could match the texture of our house but I planned to paint the wall a color that stucco does not come in...

The adult beverage portion of the project.
It seemed a waste of money (colored stucco costs twice as much as gray stucco) and since our brown coat had left such a smooth paintable surface we declared we were done with stucco and paint would be the next step.

Days went by and I watered my walls - misting them to slow the drying to keep the inevitable cracks small. Finally painting day arrived.


The cracks stayed pretty small thankfully.

Jessie (the super-hero in our neighborhood) just so happened to have access to a paint sprayer and actually knows how to use one.

He tried to teach me how to use it.  Let's just say that my inability to spray evenly explains why my omelets always stick to the pan on one side...

Jessie was able to spray the outside of the wall to match our house and a wall of the neighbors next door (on purpose even) in less than 2 hours. It took me that long to tape off all the posts.

The inside of the wall was another matter. Due to the intensity of the color I knew it had to go on thickly. So Ellen and I broke out the footstools and painted the interior wall with brushes. It took us twice as long as it had taken Jessie but we had a good gossip as we painted.


The new blue is only visible from inside the yard...and maybe outer-space.

I've had various reactions to the color:

"Sarah, are you color blind?" said Ken - our next door neighbor.
"It looks like a resort in Puerto Vallarta," said Tim a friend.
"What the #$%?," said an unnamed ex-friend.

I have created the red-neck swimming pool. We can't afford a pool but I love to look at them so by painting the wall swimming pool blue it creates a similar effect (if you have been drinking and aren't paying really close attention).

All kidding aside, the color does make the area seem festive and fun...and cooler somehow (temperature wise). And it definitely supports the emerging Hawaiian tiki theme.
Finally, I'm enjoying my hammock!!!